Wednesday, October 7, 2015

Plant UML setup in Android Studio (Mac Maverics )

Steps: 1- Install Graphviz.dmg.
2- Add android studio plugin PlantUML
       Preference - > plugins -> Plant UML
3- Setup environment variable (By Running below Command) -

launchctl setenv GRAPHVIZ_DOT /usr/local/bin/dot export GRAPHVIZ_DOT

4- In android studio - Click on View-> Plant Uml.
5- Click New-> Salt Wireframe -> paste the below lines in it (after erase all line )

@startuml
testDot
@enduml

6- Set the path of Graphviz app in Android studio settings.
click Preference-> Other settings-> Plant UML -> Graph Viz Executable Path

/usr/local/bin/dot

7- you will find the below image in PlantUML window.


Tuesday, July 28, 2015

Android Activity Transition API

There are two type of Activity Transitions-
1- Content Transition
2- Shared element transition

1- Content Transition : A content transition determines how an activity's non-shared views—called transitioning views—enter or exit the activity scene.
2- Shared element transition: A shared element transition determines how an activity's shared elements (also called hero views) are animated between two activities.

The following sections will have a good introductions.
  • Enable the new transition APIs by requesting theWindow.FEATURE_ACTIVITY_TRANSITIONS window feature in your called and calling Activities, either programatically or in your theme's XML.3 Material-themed applications have this flag enabled by default.
  • Set exit and enter content transitions for your calling and called activities respectively. Material-themed applications have their exit and enter content transitions set to nulland Fade respectively by default. If the reenter or return transitions are not explicitly set, the activity's exit and enter content transitions respectively will be used in their place instead.
  • Set exit and enter shared element transitions for your calling and called activities respectively. Material-themed applications have their shared element exit and enter transitions set to @android:transition/move by default. If the reenter or returntransitions are not explicitly set, the activity's exit and enter shared element transitions respectively will be used in their place instead.
  • To start an Activity transition with content transitions and shared elements, call thestartActivity(Context, Bundle) method and pass the following Bundle as the second argument:
    ActivityOptions.makeSceneTransitionAnimation(activity, pairs).toBundle();
    
    where pairs is an array of Pair<View, String> objects listing the shared element views and names that you'd like to share between activities.4 Don't forget to give your shared elements unique transition names, either programatically or in XML. Otherwise, the transition will not work properly!
  • To programatically trigger a return transition, call finishAfterTransition() instead of finish().
  • By default, material-themed applications have their enter/return content transitions started a tiny bit before their exit/reenter content transitions complete, creating a small overlap that makes the overall effect more seamless and dramatic. If you wish to explicitly disable this behavior, you can do so by calling thesetWindowAllowEnterTransitionOverlap() andsetWindowAllowReturnTransitionOverlap() methods or by setting the corresponding attributes in your theme's XML.

Introducing the Fragment Transition API

If you are working with Fragment transitions, the API is similar with a few small differences:
  • Content exitenterreenter, and return transitions should be set by calling the corresponding methods in the Fragment class or as attributes in your Fragment's XML tag.
  • Shared element enter and return transitions should be set by calling the corresponding methods in the Fragment class or as attributes in your Fragment's XML.
  • Whereas Activity transitions are triggered by explicit calls to startActivity() andfinishAfterTransition(), Fragment transitions are triggered automatically when a fragment is added, removed, attached, detached, shown, or hidden by aFragmentTransaction.
  • Shared elements should be specified as part of the FragmentTransaction by calling the addSharedElement(View, String) method before the transaction is committed.

1 - Content Transition 

content transition determines how the non-shared views—called transitioning views—enter or exit the scene during an Activity or Fragment transition. Motivated by Google's new Material Design language, content transitions allow us to coordinate the entrance and exit of each Activity/Fragment's views, making the act of switching between screens smooth and effortless. Beginning with Android Lollipop, content transitions can be set programatically by calling the following Window and Fragment methods:
  • setExitTransition() - A's exit transition animates transitioning views out of the scene when A starts B.
  • setEnterTransition() - B's enter transition animates transitioning views into the scene when A starts B.
  • setReturnTransition() - B's return transition animates transitioning views out of the scene when B returns to A.
  • setReenterTransition() - A's reenter transition animates transitioning views into the scene when B returns to A.

Content Transitions Under-The-Hood

when Activity A starts Activity Bthe following sequence of events occurs:1
  1. Activity A calls startActivity().
    1. The framework traverses A's view hierarchy and determines the set of transitioning views that will exit the scene when A's exit transition is run.
    2. A's exit transition captures the start state for the transitioning views in A.
    3. The framework sets all transitioning views in A to INVISIBLE.
    4. On the next display frame, A's exit transition captures the end state for the transitioning views in A.
    5. A's exit transition compares the start and end state of each transitioning view and creates an Animator based on the differences. The Animator is run and the transitioning views exit the scene.
  2. Activity B is started.
    1. The framework traverses B's view hierarchy and determines the set of transitioning views that will enter the scene when B's enter transition is run. The transitioning views are initially set to INVISIBLE.
    2. B's enter transition captures the start state for the transitioning views in B.
    3. The framework sets all transitioning views in B to VISIBLE.
    4. On the next display frame, B's enter transition captures the end state for the transitioning views in B.
    5. B's enter transition compares the start and end state of each transitioning view and creates an Animator based on the differences. The Animator is run and the transitioning views enter the scene.
By toggling each transitioning view's visibility between INVISIBLE and VISIBLE, the framework ensures that the content transition is given the state information it needs to create the desired animation. Clearly all content Transition objects then must at the very least be able to capture and record each transitioning view's visibility in both its start and end states. Fortunately, the abstract Visibility class already does this work for you: subclasses ofVisibility need only implement the onAppear() and onDisappear() factory methods, in which they must create and return an Animator that will either animate the views into or out of the scene. As of API 21, three concrete Visibility implementations exist—FadeSlide, and Explode—all of which can be used to create Activity and Fragment content transitions. If necessary, custom Visibility classes may be implemented as well; doing so will be covered in a future blog post.

Android Transition Framework

Why Transition Framework: 

We have already a very good api for Animation, why should U use it?

The transitions API is that it does an awful lot of the work for us.

Transition Framework


The transition framework provides a convenient API for animating between different UI states in an application. The framework is built around two key concepts: scenes and transitions.


Scene


A scene defines a given state of an application's UI

Transition


A transition defines the animated change between two scenes.
When a scene changes, a Transition has two main responsibilities:
1. Capture the state of each view in both the start and end scenes, and
2. Create an Animator based on the differences that will animate the views from one scene to the other.

Q1 As Activity and Fragments already using  animation Activity#overridePendingTransition() and FragmentTransaction#setCustomAnimation() methods, Why should I use Transition Framework?
That animation animate the entire Activity/Fragment container as a whole. The new Lollipop APIs  making it possible to animate individual views as they enter or exit their containers and even allowing us to animate shared views from one Activity/Fragment container to the other.

Android Transition Framework can be used for three main things:
  1. Animate View elements in transitions between activites (or fragments)
  2. Animate shared elements (hero views) in transitions between activities (or fragments)
  3. Animate View elements from one activity scene to another.

1. Transitions between Activities

Animate existing activity layout content (non-hero views)

You can define these transitions declarative using XML or programatically.

Declarative

res/transition/activity_explode.xml
<?xml version="1.0" encoding="utf-8"?>
<transitionSet xmlns:android="http://schemas.android.com/apk/res/android">
    <explode android:duration="2000"/>
</transitionSet>
res/values/style.xml
<item name="android:windowEnterTransition">@transition/activity_explode.xml</item>
To inflate specific xml defined transition:
MainActivity.java
    @Override
    protected void onCreate(Bundle savedInstanceState) {
        super.onCreate(savedInstanceState);
        setContentView(R.layout.activity_main);
        setupWindowAnimations();
    }

    private void setupWindowAnimations() {
        Explode explode = TransitionInflater.from(this).inflateTransition(R.transition.activity_explode);
        explode.setDuration(2000);
        getWindow().setExitTransition(explode);
    }

Programatically

MainActivity.java
    @Override
    protected void onCreate(Bundle savedInstanceState) {
        super.onCreate(savedInstanceState);
        setContentView(R.layout.activity_main);
        setupWindowAnimations();
    }

    private void setupWindowAnimations() {
        Explode explode = new Explode();
        explode.setDuration(2000);
        getWindow().setExitTransition(explode);
    }
DetailActivity.java
    @Override
    protected void onCreate(Bundle savedInstanceState) {
        super.onCreate(savedInstanceState);
        setContentView(R.layout.activity_main);
        setupWindowAnimations();
    }

    private void setupWindowAnimations() {
        Explode explode = new Explode();
        explode.setDuration(2000);
        getWindow().setEnterTransition(explode);
    }


What is happening step by step:

  1. Activity A starts Activity B
  2. Transition Framework finds A Exit Transition (explode) and apply it to all visible views.
  3. Transition Framework finds B Enter Transition (explode) and apply it to all visible views.
  4. On Back Pressed Transition Framework executes Enter and Exit reverse animations respectively (because it cannot find returnTransition and reenterTransition)

ReturnTransition & ReenterTransition


These two methods define the reverse animations for enter and exit respectively.
MainActivity.java
    @Override
    protected void onCreate(Bundle savedInstanceState) {
        super.onCreate(savedInstanceState);
        setContentView(R.layout.activity_main);
        setupWindowAnimations();
    }

    private void setupWindowAnimations() {
        Explode explode = new Explode();
        explode.setDuration(2000);
        getWindow().setExitTransition(explode);

        Fade fade = new Fade();
        fade.setDuration(2000);
        getWindow().setReenterTransition(fade);

    }
DetailActivity.java
    @Override
    protected void onCreate(Bundle savedInstanceState) {
        super.onCreate(savedInstanceState);
        setContentView(R.layout.activity_main);
        setupWindowAnimations();
    }

    private void setupWindowAnimations() {
        Explode explode = new Explode();
        expl.setDuration(2000);
        getWindow().setEnterTransition(explode);

        Fade fade = new Fade();
        fade.setDuration(2000);
        getWindow().setReturnTransition(fade);        
    }


2. Shared elements between Activities

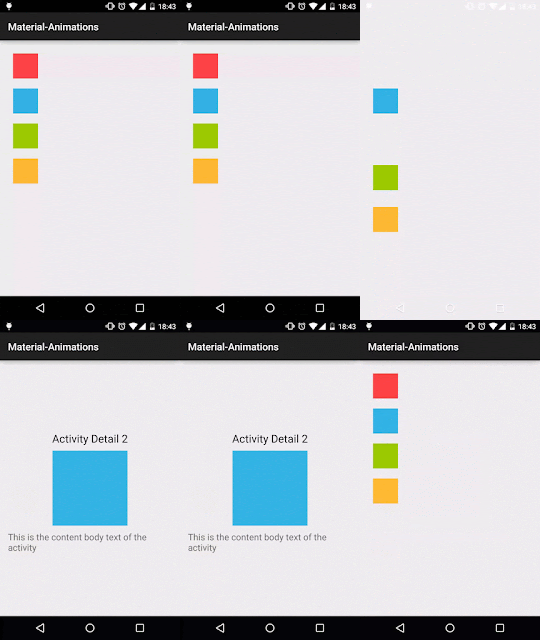
The idea behind this is having two different views in two different layouts and link them somehow with an animation.
Transition framework will then do whatever animations it consider necessary to show the user a transition from one view to another.

Keep this always in mind: the view is not really moving from one layout to another. They are two independent views.
As you can see there are two views with ids 'smallSquare' and 'bigSquare'. But they have the same'transitionName'.
This way the Transition Framework knows it needs to create an animation from one view to the other.
MainActivity.java
squareBlue.setOnClickListener(new View.OnClickListener() {
    @Override
    public void onClick(View v) {
        Intent i = new Intent(MainActivity.this, DetailActivity2.class);

        View sharedView = squareBlue;
        String transitionName = getString(R.string.square_blue_name);

        ActivityOptions transitionActivityOptions = ActivityOptions.makeSceneTransitionAnimation(MainActivity.this, sharedView, transitionName);
        startActivity(i, transitionActivityOptions.toBundle());
    }
});
layout/main_activity.xml
<View
        android:layout_margin="10dp"
        android:id="@+id/square_blue"
        android:layout_width="50dp"
        android:background="@android:color/holo_blue_light"
        android:transitionName="@string/square_blue_name"
        android:layout_height="50dp"/>
layou/details_activity2.xml
<View
        android:layout_width="150dp"
        android:id="@+id/big_square_blue"
        android:layout_margin="10dp"
        android:transitionName="@string/square_blue_name"
        android:layout_centerInParent="true"
        android:background="@android:color/holo_blue_light"
        android:layout_height="150dp" />


As you can see, Transition framework is creating and executing an animation to create the illusion that the view is moving and changing shape.
To proof the blue square view is not really moving we can do this quick exercise: change transitioName in DetailsActivity from Big Blue Square to the Title Text above it.
<TextView
        android:layout_width="wrap_content"
        android:text="Activity Detail 2"
        style="@style/Base.TextAppearance.AppCompat.Large"
        android:layout_centerHorizontal="true"
        android:transitionName="@string/square_blue_name"
        android:layout_above="@+id/big_square_blue"
        android:layout_height="wrap_content" />
If we now execute the app we have the same behaviour but targeting a different view:

3. Animate view layout elements

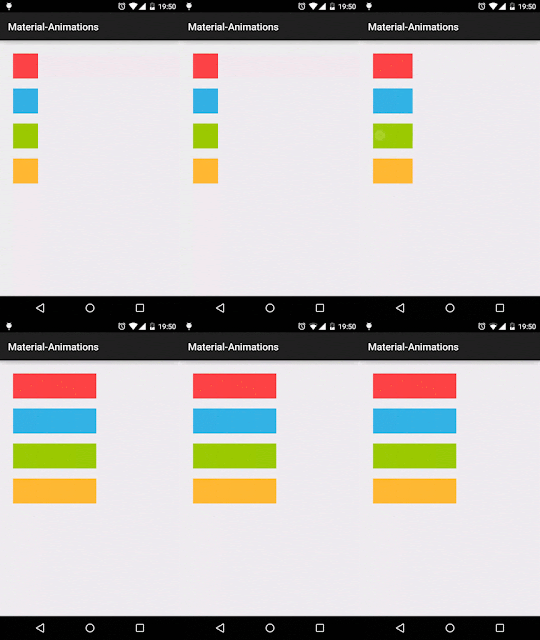
Transition framework can also be used to animate element changes within current activity layout.
Transitions happen between scenes. An scene defines a static state of our UI. You can do complex things regarding scenes but I want to keep this example as simple as possible.
If you want to know more about scenes I recomend you check this video by Chet Hasse
In this example I'm going to use the easier way to animate layout changes inside an Activity layout:
TransitionManager.beginDelayedTransition(sceneRoot);
With just this line of code we are telling the framework we are going to perform some UI changes that it will need to animate.
After that we made the changes on our UI elements:
setViewWidth(squareRed, 500);
setViewWidth(squareBlue, 500);
setViewWidth(squareGreen, 500);
setViewWidth(squareYellow, 500);
This will change those views width attribute to make it larger. That will trigger a layoutMeasure. At that point the Transition framework will record start and ending values and will create an animation to transition from one to another.
 squareGreen.setOnClickListener(new View.OnClickListener() {
            @Override
            public void onClick(View v) {
                TransitionManager.beginDelayedTransition(sceneRoot);
                setViewWidth(squareRed, 500);
                setViewWidth(squareBlue, 500);
                setViewWidth(squareGreen, 500);
                setViewWidth(squareYellow, 500);
            }
        });
    }

    private void setViewWidth(View view, int x) {
        ViewGroup.LayoutParams params = view.getLayoutParams();
        params.width = x;
        view.setLayoutParams(params);
    }